FREE Super Fruits Eye Balm with $130 or more purchase

Monday 31 October 2016

Halloween Makeup of the Day: Ice Princess

Hi, everyone- Happy Halloween! Whether you did some fierce partying over the weekend or are prepping for some tamer trick-or-treating this evening, I hope you're feeling perfectly spooky! 

Every single year, I so look forward to creating a Halloween makeup look and, without fail, every single year I have no idea what I'm going to do until the last moment. I always aim to put together a look that's artistic and a little out there but, since I haven't yet mastered any serious special effects skills (I must practice!), also something that I can put together with the makeup items I already have in my stash.

It wasn't until Friday night that some inspiration struck me- an ice princess! I'd seen some stunning versions of this sort of look online recently, so I took to perusing various creations on the web. I took mental note of some aspects that I liked, then took to the mirror Saturday afternoon and went to work! 


I wanted the look to be ethereal, pretty, slightly spooky and, of course, frosty! I started by applying the palest foundation, concealer, and powders in my stash to create a super pale base. For an extra icy finish, I topped the regular powder with the frostiest white highlighter I had. To add further shape, definition, and chill, I used a variety of mint green, teal, and navy eye shadows, with the deepest shades in the hollows of my face to contour and the lightest for some extra touches of highlight. 

I followed a similar premise for the eyes, using various shades of mint, white, and blue to add some shimmer and depth (using the Marc Jacobs The Siren and Kat von D Mi Vida Loca Remix palettes). For added effect, I whited out my brows and lower lash line using NYX Jumbo Eye Pencil in Milk and coated my lashes in a pastel green, Chanel Inimitable Waterproof Mascara in Limelight


I decided to add one pop of flushed colour to the look- a cool, frostbitten pink blush in YSL Blush Volupte Heart of Light Powder Blush 03. For the lips, I reached for the perfectly blue MAC Lipglass in Twerkquoise and topped it with the various icy eye shadows I'd used throughout. 

All of the additional detail in the look was created by two amazing eyeliners: Artdeco All in One Liquid Liner in Sea Port (a fab shimmery navy) and Illamasqua Precision Ink in Scribe, a true matte white. I had no plan for this part, but I ended up sketching some wintry trees above my brows with roots stretching down the bridge of my nose. And I was excited to remember that I had some snowflake stickers kicking around, so I added those above and below my eyes to finish things off! 


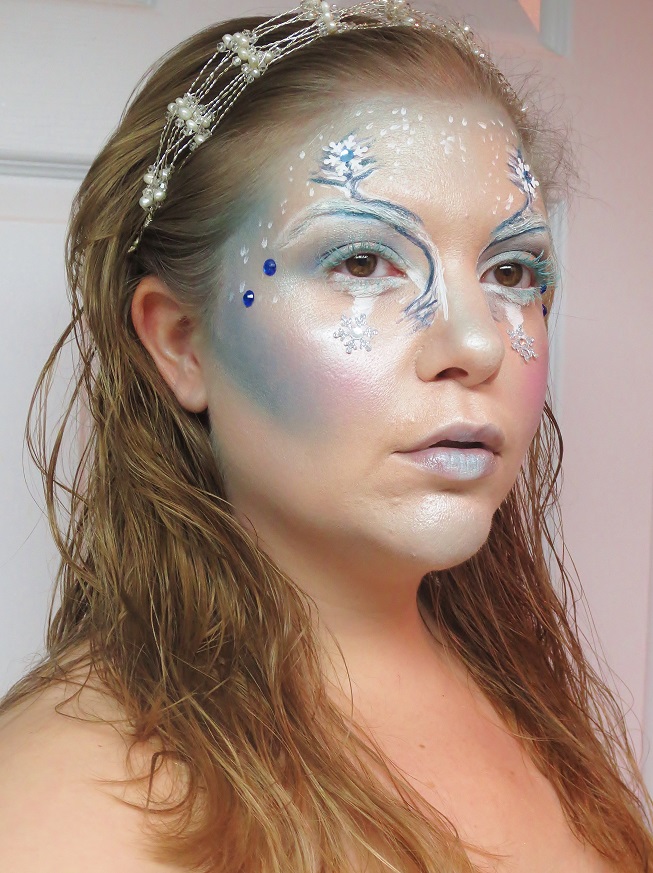
And while I didn't have a costume to go with this makeup, I wanted to accessorize things at least a bit. So I reached for the headband I wore for my wedding! I though the pale silver and pearls complimented the makeup quite well! 

A couple more shots of the look: 


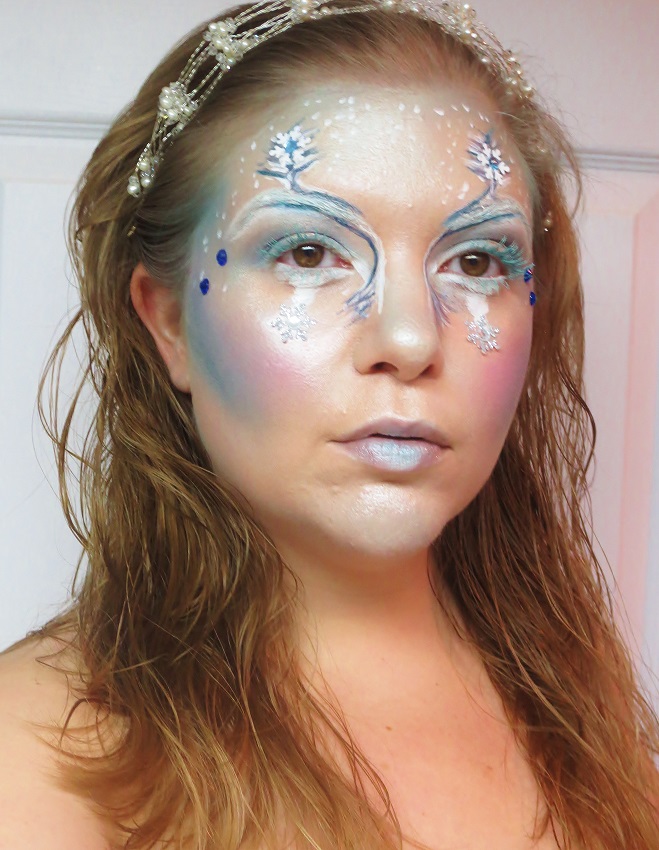
This was another makeup look I really didn't want to wash off- I felt totally frosty and regal! 

Do you get into Halloween? What's your costume this year?

Thanks so much for stopping by! Booo!!

                                                Bloglovin'|Facebook|Twitter|Instagram

Friday 28 October 2016

My Wedding Day Hair and Makeup

Hi, everyone! In my last post, I shared with you some shots from my wedding day. I can hardly believe it was a week ago now! Last Saturday and the days to follow were the most lovely whirlwind possible and I'm just now re-adjusting to the regular pace of life. 

Prior to the wedding, I thought I'd use the big day as an opportunity to blog like crazy- to create several posts about wedding planning and makeup trials, to photograph a tutorial, to Snapchat as I got ready. In the end, very little of that happened. As much as I love sharing my experiences with you all (especially as they relate to makeup!) I chose to instead really be in the moment rather than documenting each and every step. That said, my wedding hairstyle really was something special, as was the fact that I got to create my own bridal makeup- so I took just enough shots to share those with you! 


I did my best to design the big day to be as smooth, relaxed, and non-rushed as possible. I think I achieved just that! After a 9:30am breakfast date with my friends who flew in from South Carolina, I headed up to my hairdresser for an 11:30am appointment. I knew that so many brides have 7am call times on their big day and, knowing my nerves would be vibrating even if I slept lots the night before, I decided to not set myself up for more sleep deprivation than I could handle! 

I was beyond buzzing when I arrived for my hair appointment, as I had met with my stylist twice before already- once for a haircut, once for a wedding hair trial. Introduced to me by fellow blogger and buddy Julie (from Swatch and Review), June Croken (Hairdresser on Fire) is all kinds of awesome. Not only is she an utter sweetheart, she has years of experience as a graphic artist and hairstylist and her passion for hair as an art form is truly apparent. When you're in her chair, you not only learn tomes about your own hair and how to take care of it, you will also leave with a cut or style that is perfectly tailored to you. Her aesthetic is totally up my alley- edgy and a bit rock n' roll, but also soft, beautiful, and organic. Plus, she's a huge David Bowie fan, which bonded us right away! 


June started the style by applying a generous helping of dry shampoo and tightly curling my entire mane. We joked that she could just stop there, but luckily, she continued! After the curling, she delved into a flurry of braiding, twisting, and pinning and finished the style by pinning in the headband I'd purchased for the day- an ethereal creation of silver and pearls. 


And here is the end result! I could not have been happier with the unique, stunning blend of braids, curls, and twists. It was architectural, yet soft and a perfect blend of the vintage and modern vibes that we were trying to channel for the wedding. 


And a couple more shots to get the full effect: 


Now onto the makeup! After the hair appointment, I walked over to our wedding venue, Campbell House, to get ready with my Mom and sister. We had access to the House's upstairs bedroom, a perfect antique time capsule that made the moment extra special! The room was largely shrouded with curtains, but I was able to push a corner aside and grab a patch of natural, sunny lighting. Equipped with my makeup bag and a magnifying mirror, I got to work!  


So  what makeup items made the cut for the big day? Let's break it down!

After testing a variety of high-end foundations to wear for the wedding, I ultimately chose a longtime, affordable classic, Revlon ColourStay Whipped Creme Makeup in Buff. For concealer, I used Urban Decay Naked Skin Concealer in Fair Neutral on the areas I wanted some paler coverage (under my eyes, between my brows, down the bridge of my nose) and the new Dermablend Smooth Liquid Camo Concealer in Fair/Biscuit on other areas of redness and shadow. To set things, I applied MAC Blot Powder in Medium on the t-zone and the new NYX #NoFilter Finishing Powder in 02 Ivory everywhere else for a touch more coverage and a soft glow. I contoured my cheeks lightly with NYX Powder Blush in Taupe and added warmth to my complexion with Revlon PhotoReady Bronzer in 100 Bronzed & Chic. For blush, I used the colour that my sister had bought me specifically for the wedding: Tarte Amazonian Clay Blush in Blushing Bride- a perfect mid-tone cherry pink. To add some extra glow, I used a mix of MAC Mineralize Skinfinish in Lightscapade and Becca Shimmering Skin Perfector Pressed in Champagne Pop to the high points of my face. 

The brows were a no-brainer: I reached for the product that I've been loving for almost a decade now- Anastasia Brow Powder Duo in Taupe, topped with Anastasia Tinted Brow Powder in Caramel. Before applying shadow, I used the Essence I Heart Colour Intensifying Shadow Base as a primer. I went back and forth for ages about what eye shadow palette I'd reach for on the day, but I ultimately chose the beautiful and versatile Too Faced Natural Eyes Neutral Eye Shadow Collection. I started by sweeping Nudie and Cashmere Bunny, both neutral taupe shades, in the crease for definition. I then applied a mix of Honey Pot (a shimmery gold) and Push-Up (a shimmery champagne pink) across my lids for some glow. I then defined the outer corners of the eyes with a mix of Erotica (a deeper taupe with silver glitter) and Sexpresso (a deep neutral brown with subtle gold glitter), blending up to the crease. Finally, I used a blend of Heaven (a matte bone white) and Silk Teddy (a shimmery ivory pink) to my brow bones and inner corners of the eyes. For eyeliner, I reached for two plummy faves. I first applied a thick line of Trish McEvoy 24-hour Shadow and Liner in Glamorous, winging the colour up and out. I then defined the outer half of my eye with the deeper, more sultry Chanel Le Crayon Kohl  in Rouge Noir. And the lashes, all Essence! I applied a few coats of Forbidden Volume Mascara to plump things up and finished with a layer of Forbidden Volume TopCoat for some extra va-va-voom! 

After applying the base and eye products, I spritzed my face generously with Tatcha's Luminous Dewy Skin Mist to bring some glow and more of a natural skin-like quality to my complexion. 

Here's a shot of everything I used! 


And the look wouldn't have been complete without the lips, of course! If you've been following my blog for the past several months, you'll know that I was lucky enough to custom make my wedding lipstick at the Bite Beauty Lip Lab in New York City. (You can see my post about creating it, here!). I could not have been more thrilled with the ultra matte, bold, saturated reddish berry that resulted. I actually based our wedding's colour scheme (my sister's dress, my bouquet, our napkins) on the shade. Leave it to me to design a wedding around a lipstick! ;)


And here it is- the final look! After finishing the makeup, I snuck down to Campbell House's Withdrawing Room, the lovely little nook where our ceremony took place, to scope things out and capture the look in some afternoon light. At this point, my expression looked calm, but the butterflies were circling internally, let me tell you! 

A


I was really happy with how my makeup came together on the day- I was super nervous and my skin was by no means perfect (leave it to pre-wedding stress to cause an eruption!), but the products I used did an amazing job to keep me looking fresh! I'm glad I was able to create a look that was something special, but also looked like me, not some sort of bridal impostor. Does that make sense?!

In the end, the makeup was just a small piece of the special day, but getting ready with my Mom and sister and being able to sport a lipstick I created myself will always be treasured aspects of my wedding! 

What's your ideal wedding makeup? What kind of look did you wear on your big day?

Thanks for stopping by and have an amazing week! 

                                              Bloglovin'|Facebook|Twitter|Instagram

Thursday 27 October 2016

So This Happened... (We Got Hitched!)

Hi, everyone! If you follow me on Instagram, you'll know that this past weekend was something special. If you don't (you should, though!), surprise- Adam and I got married! We have been together for nearly seven years now (time has flown!) and engaged since March, and this past Saturday was the big day when we finally made it official. 

We wanted to keep things intimate, personal, easy, and fun- and I think we accomplished just that! We held the ceremony and dinner at Toronto's Campbell House, an early 1800s home-turned-museum right in the heart of downtown. We'd always loved that the venue had a vintage aesthetic that spoke to our love of history and all things antique, but that it was also surrounded by the urban landscape that we live and work in every day. We were joined by 25 of our closest family and friends, which made for a manageable guest list that allowed for proper mingling. It was so neat and wonderful to see our friends and family chatting with each other like old buddies! 


After getting my hair done (I'll have a full blog post dedicated to my wedding hair and makeup coming next), I walked over to Campbell House, just four blocks away, to start getting ready. We were lucky to have access to the upstairs bedroom where my Mom, sister, and I did our makeup and got dressed. We put on some tunes, ate a few snacks, and otherwise tried to stay calm :)

Here is my Mom zipping me up! 


And yes, the dress!! I could not have been more smitten with my gown, that's for sure. I was lucky enough to snag it during an off-the-rack sale at Becker's Bridals, where I scored a 75% discount. It was designed by Barbra Allin, Becker's in-house designer, who actually saw me in the dress the day I tried it on and gave me her stamp of approval. What more could I have asked for!?

I got the alterations done at Elie's Alterations in Yorkville, who did a fantastic job at shortening the hem while keeping all the detailing, as well as nipping in the waist and straps to fit me just perfectly! I purchased my necklace at Fossil and my headpiece from It's Your Day in LaSalle, ON (near my hometown of Windsor, where my sister got her bridesmaid's dress). The shoes (which you may spy in later pictures) I found at Ardene for a mere $14.50- a true steal! 


Here are some shots of my Dad seeing me in my dress for the first time before the ceremony- it was a lovely, emotional moment! :)


Before the ceremony, we got to take some solo and family photos in Campbell House's beautiful ballroom. Here I am with my sister, brother-in-law, and my little niece and flower girl! 


And a view of my dress from the back. I'm obsessed with the train! 


My niece, Lily, really kept me calm before the ceremony. All she wanted to do was sit on the windowsill, look outside for cars, and dance! 


The ceremony itself was simultaneously a blur and a completely warm, emotional, happy moment. I'll have photos from the ceremony itself to share once we have the shots from our photographer! 

After the ceremony was an hour for photos, appetizers, and wine, during which Adam and I got to brave the cold, but beautiful outdoor grounds of Campbell House for photographs and our loved ones got to drink and mingle. Following this, we headed downstairs to the house's Historic Kitchen, which was lit up completely by candlelight and the fireplace. It was a truly warm, magical setting- I wish I could eat there everyday! So dreamy. 


The food was absolutely delicious (thanks to A La Carte) and the icing on the cake (literally) was our wonderful wedding cake- baked by Adam himself!! He concocted the most delicious gluten-free banana bread cake topped with cream cheese icing and strawberries. He also found the most adorable vintage wedding toppers that were the perfect quirky finishing touch! 


Here are Adam and I with the cake- and of course Lily had to get in on the action! 


We  really could not have asked for a more beautiful day, so full of love. We are thrilled to be newlyweds and to have been able to celebrate with our favourite people. So happy and lucky! 

Keep an eye out for a post about my wedding hair and makeup, as well as another post featuring shots from our photographer, coming soon! 

Thanks so much for stopping by and a heartfelt thank you to all of you who have left messages of congrats so far! xo

                                           Bloglovin'|Facebook|Twitter|Instagram

Wednesday 19 October 2016

MAC #LimitedEdition Photographs by Helmut Newton Collection Info

Hi, everyone! The sea of makeup collaborations is quite full at the moment, with brands pairing up with celebs and bloggers left and right. While some amazing products have been born from these collabs, the genre is a bit over-saturated at the moment. As such, I was happy to see that MAC was releasing a collection inspired by someone who's actually been a staple in the fashion and beauty industry for years, Helmut Newton! I've always admired his bold, sexy, empowering beauty shots so I knew this collection would be equally sultry and glamorous! 


Here's what MAC has to say about the release:

"M∙A∙C Limited Edition celebrates the erotically charged and elegant work of legendary photographer, Helmut Newton. A regular contributor to Vogue and Vanity Fair, Newton is known for his precise, glamorous and empowering photography of women. This limited-edition color collection captures the photographer’s provocative, exquisite taste, dressing wine-stained lips in sultry rogue while darkening eyes in the black and white shades of his signature aesthetic. Nails are lacquered in colors inspired by Monte Carlo and Berlin, two of his homes. A selection of Newton’s most iconic photographs adorns the bespoke packaging – his work remains as distinctive and influential as ever".

MAC chose the following shots to inspire the colours of the collection:


The collection includes three shades of Retro Matte Liquid Lip Colour ($21 USD/$25 CAD) in various hues of classic red: 

High Heels- Red
Chateau M- Deep Red Wine
Self Portrait- Dark Plum


A quad of sultry, classic neutrals: Point 'n' Shoot/Eye Shadow x4 ($32 USD/$42 CAD)featuring: 
Real Fantasy- Soft Eggshell (Matte)
Hard Currency- Grey (Matte)
Influential- Brown (Satin)
Point and Shoot- Black (Matte)

and an ultra black mascara and liner: Liquid Eyeliner in Boot Black ($21 USD/$24 CAD) and Upward Lash mascara in Upward Black ($23 USD/$28 CAD)


Finally, the collection includes three MAC Studio Nail Lacquers ($13 USD/$15 CAD) in

Berlin- Purple (Creme)
Call Time- Grey (Creme)
Monte Carlo- Red (Creme)


If you're up for some bold, classic glamour, you can find the MAC Limited Edition Photographs by Helmut Newton online October 27th and in-stores November 3rd! 

Thanks for stopping by! Hope you're all having an amazing week! 


Monday 10 October 2016

Better than Cleansing? Taking the FaceOff Challenge

Hi, everyone! When it comes to skin care, this gal takes her cleansing seriously. Since I wear a fair amount of makeup daily and also have breakout-prone skin, I generally find it essential to double cleanse each night- first using a cleansing oil/balm to remove makeup and then a second cleanser to properly clean my skin. So when I was contacted by a brand offering a face cloth that promised to remove makeup gently and effectively without any sort of cleansing agent, I was ultra skeptical. There's no way it will remove all my makeup, I thought. It'll probably be so rough it'll wreck my sensitive skin, I hypothesized. Yet, I was also intrigued. Although I love a good cleansing ritual in the evening, there was something promising about the idea of finding a quick method of removing makeup, gentler than cleansing wipes, that could take care of my skin on those ultra lazy nights. So I decided to but the FaceOff** cloth to the test! 


The FaceOff** came packaged in a cute pink and white cardboard box and touts itself as the "amazing cloth that removes face and eye makeup using only warm water". 


The back of the packaging features several claims and promises, including that the cloth is natural and reusable, will remove all forms of makeup and impurities, is safe, effective, and free from chemicals and detergents, and that it will reduce the harshness, cost, and complexity of your evening skin care routine. It explains that the cloth is able to do so via the weave of ultra-thin fibres designed to gently clean and exfoliate the skin. It claims to be suitable for all skin types, including those with the most sensitive of skin (even babies!).


The FaceOff** is a decent size as face cloths go. As you can see below, it is notably larger than my hand:


As  for directions, the packaging simply instructs you to wet the cloth and gently wipe of the entire face and eye area. 


So  how did it perform!? Let's look at some action shots to find out!

Here I am with the fresh new cloth, followed by a close-up of my skin at the end of the day. As you can see, there is some oil breakthrough and fading of my makeup, but generally the day's makeup is largely intact. The day of the experiment, I was wearing an amount of makeup typical for me- foundation, concealer, powder, blush, bronzer, highlighter, brow powder, eye shadow, liner, and mascara. 


Full face of makeup, pre-FaceOff

And here I am with half of my makeup removed. As you can see, the cloth worked well enough that you can clearly notice the difference between my made-up side and my freshly cleansed size. There was definitely proof on the towel that much makeup had been removed as well! 


FaceOff cloth used on left side (your right) of my face

I then proceeded to use the other side of the cloth to clean the right side of my face. Again, the cloth showed evidence of removing both face and eye makeup. 


And here is a closeup of my skin, freshly wiped with the FaceOff**. As you can see, it looks quite clean, with the exception of some remnants of mascara around my lash line. You'll also notice that my skin does not look red or irritated- quite calm and even, in fact! 

Post- FaceOff cloth

So, my skin looked clean, but was it actually clean? I put this to the test by soaking a cotton pad in micellar water and then sweeping the pad across my skin to test for residue. Looking at the pad afterwards, I have to say that I was pleasantly surprised! You'll see that some hints of foundation and mascara came off with the micellar water, but very small amounts. No evidence that tons of makeup was left behind! 


So the final verdict? I'm quite impressed! First off, the cloth really did feel extremely gentle and soft on my sensitive skin. Typical face cloths and even the muslin cloths included with some skin care brands generally feel like cheese graters on my sensitive complexion. But not this one! It didn't seem to irritate my skin one bit. On top of that, it really removed makeup quite well! I wear a fair amount of makeup, so that fact that this cloth and water alone removed about 90% of my makeup without harshness was truly a pleasant surprise. Plus, the FaceOff is less chemical-laden and better for the environment that most face wipes on the market! The only downsides in my view are that I had to apply a bit more pressure around the eyes, an area where I generally try to be ultra careful. Also, the lifespan of this cloth is improved when hand washed versus cleaned in the washer, something that I just might be too lazy to do on a regular basis. Not necessarily a fault of the cloth, though! 

Overall, I won't be ditching my regular cleansing routine anytime soon, as it's a pampering time I much enjoy, but I'll definitely keep the FaceOff** handy on nights when I know I'll want to keep my skin care routine ultra quick and simple (perhaps after my upcoming bachelorette party?)!

If I've tempted you, you can find the FaceOff** here!

What do you use to remove your makeup/cleanse your skin in the evening?

Thanks for stopping by! Have an amazing week :)

                                             Bloglovin'|Facebook|Twitter|Instagram


**This product was sent to me as a PR sample for consideration and review. All opinions expressed in this post are 100% authentic and my own!